
Understanding the Pedal Assist Levels on Electric Bikes
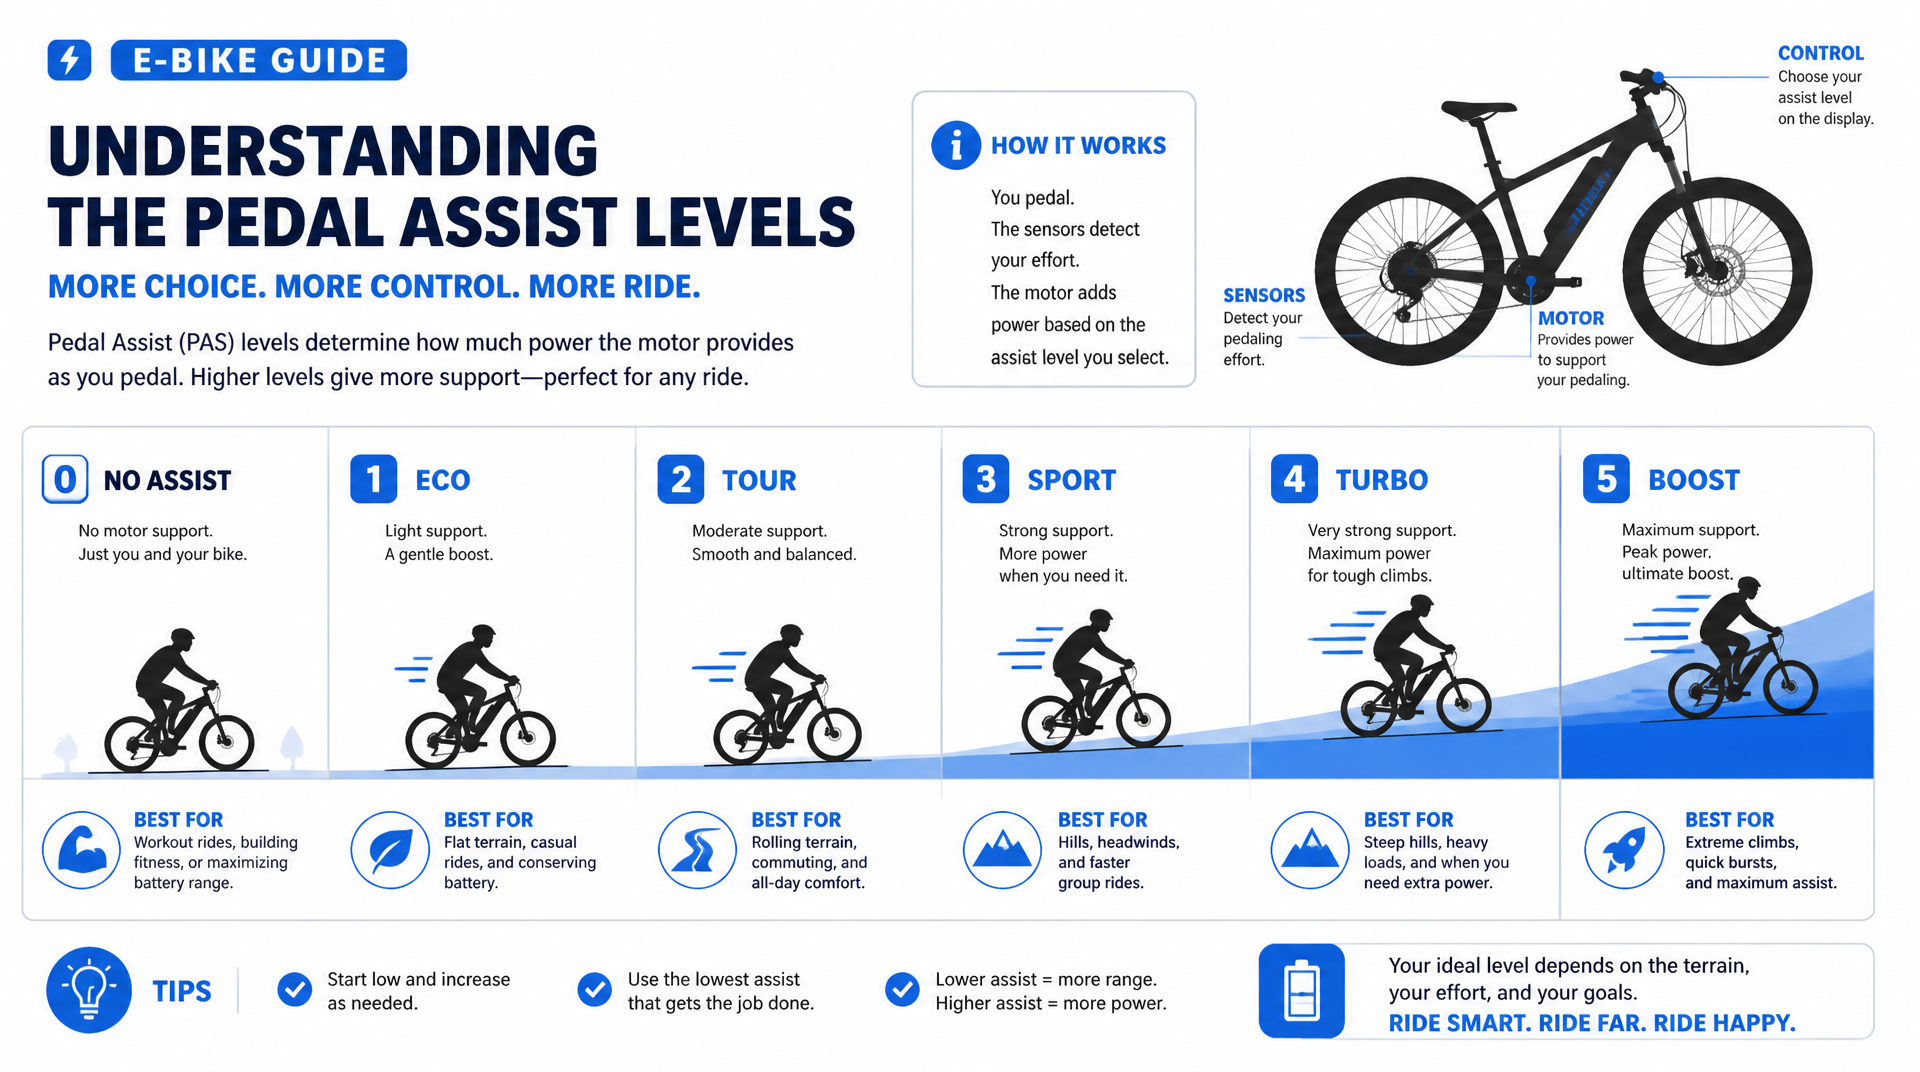
Pedal assist levels on an electric bike let you choose how much motor help you get while pedaling. Most e-bikes offer a numbered range—often 0 through 5 or 1 through 9—where a higher number means the motor contributes more power for the same pedal effort. The assist level you select directly affects your speed, battery range, and how much work your legs do. Exactly how those levels behave depends on the type of sensor your bike uses and how the controller interprets your pedaling.
How Pedal Assist Levels Actually Work
When you pedal, a sensor on the bike detects your movement and sends a signal to the motor controller. The controller then matches the power output to the assist level you’ve selected. The two most common sensor types handle this detection differently, which is why the same level number can feel quite different from one bike to another.
Cadence Sensors vs. Torque Sensors
A cadence sensor uses a magnet ring and a pickup to detect that the cranks are rotating. Once it senses pedaling, it tells the motor to deliver a preset amount of power based on the assist level. More magnets in the ring mean the sensor can detect the start of pedaling faster and provide smoother transitions between levels. For example, a low-cost cadence sensor may have 8 or 12 magnets; a higher count (16 or 20) gives finer granularity. The bike responds within about half a crank rotation, but the motor output is essentially “on or off” within that level—you get a fixed power until you stop pedaling or change level.
A torque sensor measures how much force you apply to the pedals. The motor then delivers a proportional amount of assist—pedal harder, get more help; pedal lightly, get less. Torque sensors offer a more natural, intuitive ride because the motor power scales with your effort. Bikes with torque sensors often use the same numbered levels, but each level acts as a multiplier on your pedal force rather than a fixed power output.
If your bike has a cadence sensor, you’ll notice a more pronounced surge when you start pedaling, and the assist tends to feel either “on” or “off” within a level. With a torque sensor, the power feels smoother and more connected to your pedaling rhythm.
Practical implication for your next ride: Knowing which sensor type your bike has helps you set realistic expectations. If you feel a jerky on/off sensation, that’s normal for a basic cadence sensor—you can smooth it by pedaling more continuously or by upgrading to a higher-magnet sensor. If your bike has a torque sensor, you have less need to fiddle with levels because the power naturally follows your effort.
Typical Level Ranges and What They Feel Like
Most e-bikes label their levels from 0 (no assist) up to 5 or sometimes 9. A few manufacturers use different scales (e.g., Eco, Tour, Sport, Turbo), but the principle is the same. Below is a general guide for a common 5-level system:
| Level | Typical Use | What to Expect (Cadence Sensor) | What to Expect (Torque Sensor) |
|---|---|---|---|
| 1 (Eco) | Extending range, flat terrain | Light push; top assisted speed ~10–12 mph on a 500W hub motor. Feels like a gentle tailwind. | Very proportional – you pedal lightly and get a small boost; feel the battery stretching. |
| 2 | Gentle hills or headwinds | Moderate assist; still feel exertion but pace picks up. | Assist scales smoothly as you push harder; comfortable for flat cruising. |
| 3 (Standard) | Daily commuting, mixed terrain | Balanced assist; maintain 14–16 mph without heavy effort. |
| About 1.5–2x your pedal force; feels natural on most terrain. |
| 4 (High) | Steeper hills or faster commutes | Strong assist; moderate hills manageable. Battery drains noticeably faster. | Motor delivers high multiplier; climb steep grades without straining. |
| 5 (Turbo) | Steep grades or maximum speed | Full power; motor does most work. Battery life drops to shortest. | Maximum multiplier; motor pulls hard with any pedal pressure. |
Actual speed and range vary by rider weight, bike weight, tire pressure, wind, and battery capacity. On a 750W mid-drive with a torque sensor, Level 5 may push you well past 20 mph on flat ground, while a 350W hub-motor bike may max out at 18 mph regardless of level.
How to Check Your Bike’s Sensor and Actual Level Behavior
To confirm what sensor your bike uses and how its levels behave, you don’t need a mechanic. Try this simple verification:
1. Sensor type test: With the bike powered off, turn the cranks slowly by hand. If you feel a slight magnetic pull or hear a soft clicking from the bottom bracket area, you likely have a cadence sensor. If there’s no clicking and the cranks spin freely, you may have a torque sensor—but the only sure way is to check your bike’s specifications or look for a torque sensor sticker on the bottom bracket or motor.
2. Level number range: Check the display or handlebar remote. Cycle through all levels and note the highest number. Some displays show 0–5, others 1–5 or 1–9. Write it down.
3. Actual power delivery: On a safe flat stretch, ride in Level 1 and then jump to Level 5. Note the difference in acceleration and top speed. If the jump feels huge and jerky, that’s typical of a basic cadence sensor. If it feels smooth and predictable, you may have a torque sensor or a well-tuned cadence sensor with many magnets.
This quick check tells you if your current setup matches your expectations. If you were hoping for smooth proportional assist but got on/off surges, you now know the hardware limitation.
Choosing the Right Level for Different Rides
Instead of leaving the bike at one level all day, adjusting based on your route and goals can extend battery life and reduce strain.
- Maximizing range: Use the lowest level that still lets you maintain a comfortable pace (usually Level 1 or 2). Pedal more, especially on flat stretches. Reserve higher levels for hills or tailwinds. This approach can double your miles compared to riding in Level 5.
- Commuting on a schedule: If you need a consistent speed, find the level that keeps you at that speed with moderate effort. On a flat route, Level 3 often achieves 15–16 mph without exhausting you. Increase level when facing headwinds or slight inclines to maintain pace.
- Climbing steep hills: Shift to a low gear and use Level 4 or 5. Let the motor take the brunt of the climb. Even with a torque sensor, a lower gear helps keep your cadence steady so the assist stays smooth.
- Recovery or low-exertion rides: Use Level 5 and pedal lightly. Ideal if you need to get somewhere without breaking a sweat—though you’ll sacrifice range.
Trade-off you need to know: Relying on Level 5 for an entire ride can cut your battery range by 50–70% compared to Level 1 on the same route. If you live in a hilly area, that trade-off may be necessary for climbs, but on flat ground you’re wasting capacity. The practical decision: if you frequently run out of battery before reaching your destination, try dropping one level for the first half of the ride and see if you can still maintain your needed pace.
Common Misconceptions About Pedal Assist Levels
“A higher level always means a higher top speed.” Not exactly. Many e-bikes are speed-limited to 20 mph (Class 2) or 28 mph (Class 3) regardless of assist level. Once you hit that legal limit, the motor stops assisting. Higher levels get you to that limit faster, but won’t push you past it.
“You have to pedal at all times for the motor to work.” Correct—pedal assist requires pedaling. Some e-bikes also have a throttle that allows motor-only riding, but throttle and pedal assist are separate systems. If your bike has no throttle, you must pedal to get any motor support.
“More levels means a better bike.” The quality of assist has more to do with the sensor type and controller tuning than the number of levels. A well-tuned 3-level torque sensor bike can feel far more natural than a poorly designed 9-level cadence sensor bike.
“Changing levels while riding damages the motor.” It’s safe to shift levels mid-ride on virtually all e-bikes. The controller seamlessly adjusts power to the new setting. Just avoid shifting the bike’s mechanical gears under full motor load if possible—ease off pedaling momentarily as you change gears.
Upgrading Your Sensor: What to Watch For
If your e-bike feels jerky or unresponsive between assist levels, the culprit may be the pedal assist sensor itself. Older or budget cadence sensors with fewer magnets can create a noticeable delay or an abrupt on/off feel. A common upgrade is to replace the stock sensor with a higher-magnet unit for smoother transitions.
For example, the Luatoxry Electric Bike Pedal Assist Sensor uses 12 magnets in a compact PC-plastic housing. It’s designed as a drop-in replacement for many common cadence sensor mounts (often labeled KD-2PS-L) and operates at 4.5–6V. Upgrading from an 8-magnet sensor to this 12-magnet version can reduce the dead zone between pedal strokes and make each level feel more consistent.
Another option is the KT V12L Pedal Assist Sensor, sized for left-side crank mounting and compatible with KT controllers and most 12–72V e-bike systems. It also uses a magnet ring for cadence detection and offers high precision. If you have a conversion kit with a KT controller, this sensor is a straightforward compatible replacement.
Mismatch risk to avoid: Sensors are not universal. The connector type (3-pin, 5-pin, JST, etc.), voltage range (commonly 4.5–6V or 12–72V), and mounting hole pattern differ between brands. Buying a sensor that looks identical but has a different connector will leave you with a part that doesn’t plug in. Before ordering, remove your existing sensor, photograph the connector, and count the pins. Check the listed compatibility against your controller brand. If you install a sensor with the wrong voltage rating, you risk damaging the controller or the sensor. A concrete consequence: a mismatched 12V sensor plugged into a 5V system may not work at all, and a 5V sensor on a 12V system can burn out within minutes.
For a more fundamental upgrade, consider switching from a cadence sensor to a torque sensor. That change is more involved (often requires a replacement bottom bracket or a new motor controller), but it transforms the riding experience. If your bike’s frame and drivetrain support it, the smoother power delivery is worth the effort—but confirm that your controller is compatible, or you may need to replace both.
Keeping Your Sensor in Good Shape
Pedal assist sensors are generally durable, but they can fail if exposed to water intrusion or physical damage. If you notice inconsistent assist—motor cutting out even when you’re pedaling steadily—start by checking the sensor connection and the magnet ring alignment. Make sure the ring isn’t cracked or missing magnets. For cadence sensors, a quick test: spin the crank by hand and listen for a clicking sound from the sensor, which indicates the hall-effect detector is reading the magnets. No sound often means a dead sensor or a wiring issue.
Replacing a cadence sensor costs under $20 and takes about 20 minutes with basic tools. The sensor listed above (like the Chazcool Electric Bikes Sensor) uses reinforced PC plastic and is built to last, though you should still check your bike’s specific connector type before ordering.
Understanding your pedal assist levels—and the hardware that delivers them—puts you in control of your e-bike’s performance. Adjusting levels for the terrain, conserving battery when you need to cover distance, and keeping the sensor in good working order are simple actions that make a real difference every ride.