
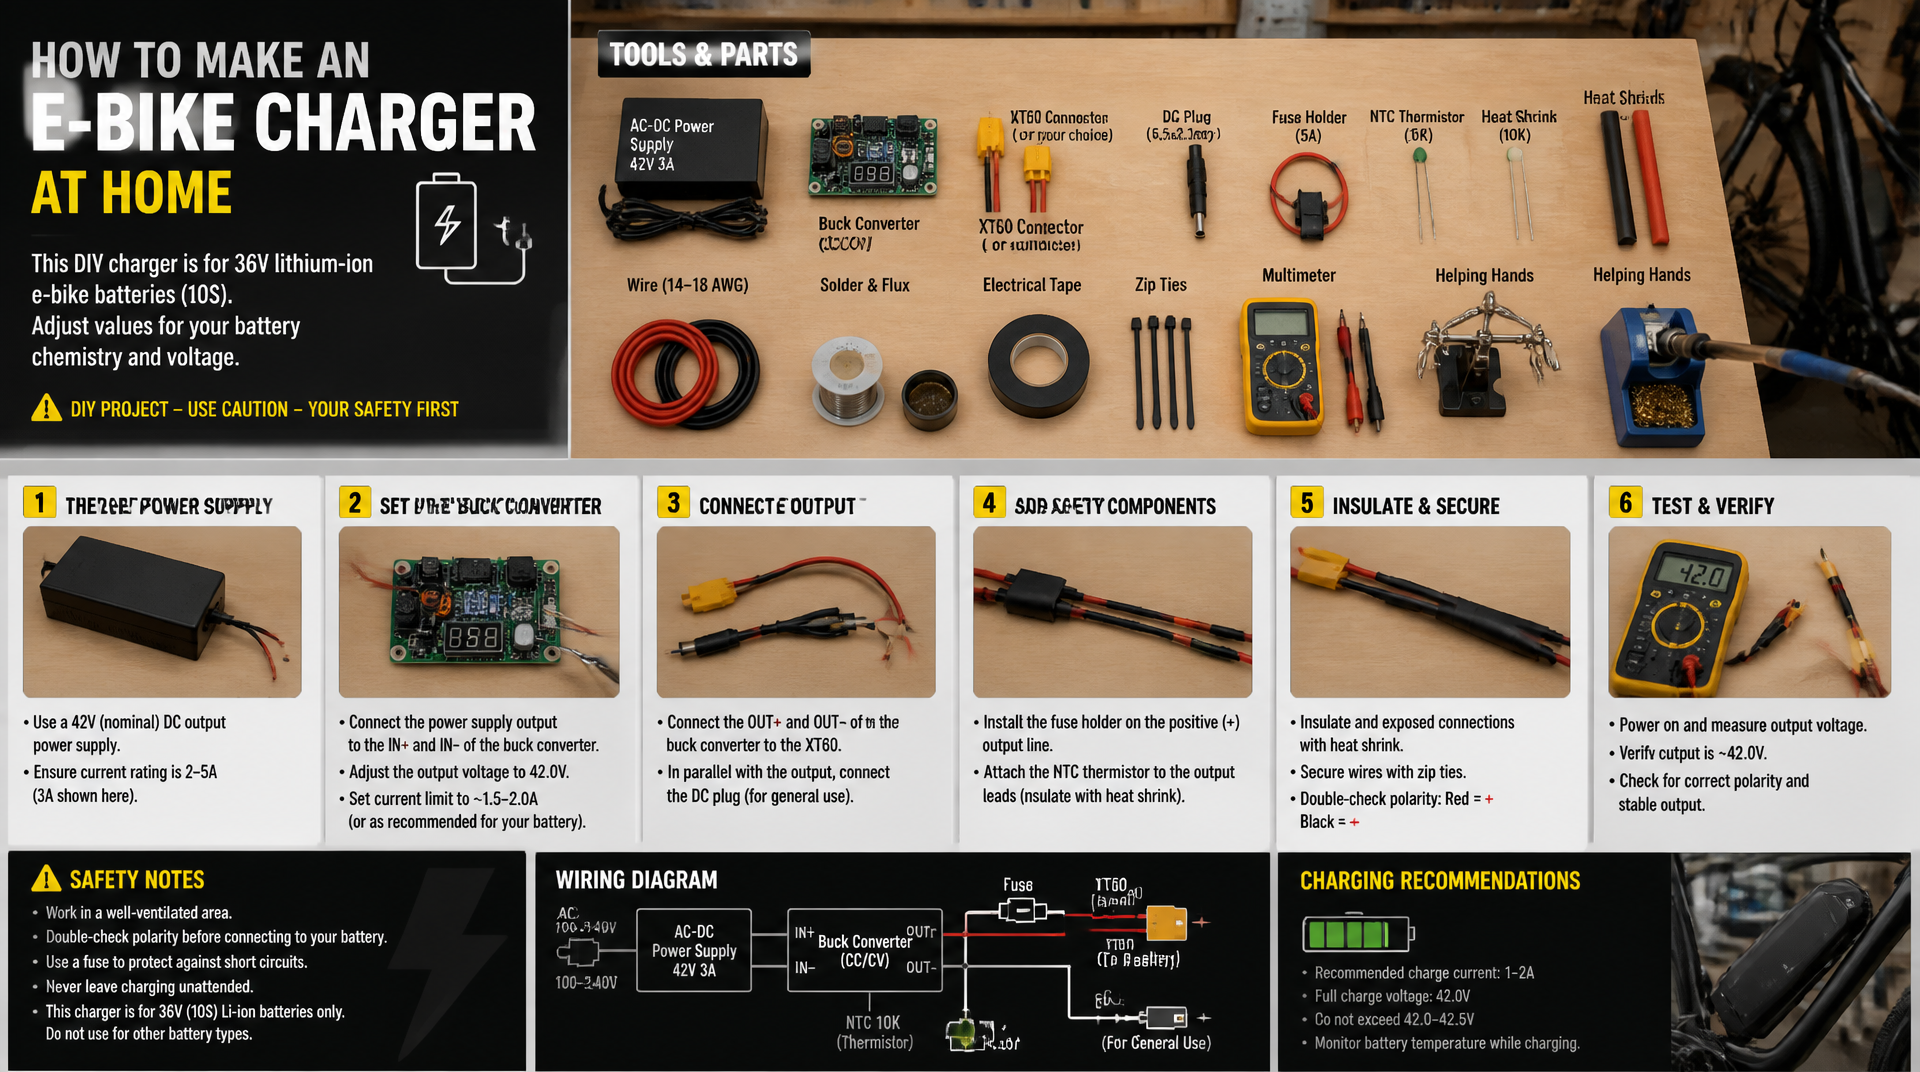
How to Make an E-Bike Charger at Home
You can build a functional e-bike charger at home if you have basic electronics skills and a healthy respect for high-voltage DC circuits. This guide walks through a constant-current/constant-voltage (CC/CV) charger suitable for 36V or 48V lithium-ion battery packs. Do not attempt this project without a multimeter, a clear understanding of battery chemistry, and the ability to safely handle AC mains wiring. One mistake can destroy your battery or cause a fire.
If you only need a temporary emergency charge, skip ahead to the FAQ. For a permanent charger, read every section before buying parts.
What You’ll Need
| Component | Purpose | Typical Spec (36V pack) |
|---|---|---|
| AC-to-DC power supply (e.g., laptop brick) | Provides isolated DC voltage | 42V output, 4–5 amps |
| CC/CV buck converter module | Limits current and holds voltage | Input 42V, output adjustable to 42V (for 36V pack) |
| XT60 or Anderson PowerPole connector | Battery connection | Rated 30A+ |
| Multimeter | Voltage and current verification | Any true-RMS meter |
| Fuse (inline) | Overcurrent protection | 5A fast-blow for 36V/4A charger |
| 14–16 AWG silicone wire | Wiring | Stranded, high-temp insulation |
| Soldering iron, heat shrink, screwdriver | Assembly | Standard tools |
Image placeholder: Photo of the major components laid out on a workbench with labels.
Step 1: Select the Right Power Supply
The input supply must deliver a DC voltage slightly higher than your battery’s full charge voltage. For a 36V nominal (10S) lithium-ion pack, full charge is 42.0V. For 48V (13S), full charge is 54.6V. Use a power supply that:
- Outputs at least 2–3V above the full charge voltage (to give the buck converter headroom).
- Delivers enough current to charge at the desired rate (typically 0.2C to 0.5C of pack capacity). A 4A supply works for most 10–15 Ah packs.
- Is isolated (AC input to DC output). Most laptop bricks and LED drivers are isolated; cheap boost converters from bare AC-DC modules often are not.
Example: For a 36V pack, use a 42V 4A LED driver or a salvaged 42V laptop brick. For 48V, a 54.6V supply is harder to find — many builders use a 48V Mean Well supply and tweak its trim pot to 54.6V, or stack two lower-voltage supplies in series.
Image placeholder: Close-up of a 42V LED driver showing its voltage and current labels.
Step 2: Wire the CC/CV Buck Converter
A CC/CV buck converter module (like the popular DPS5005 or a pre-built 400W/20A step-down board) will regulate the charging profile. Most modules have two potentiometers: one for output voltage (CV) and one for current limit (CC).
1. Set the output voltage first: With no load, turn the CV pot until the meter reads the pack’s full charge voltage (e.g., 42.0V). Lock the pot with a dab of nail polish or a set screw if available.
2. Set the current limit: Short the output through a dummy load (a power resistor or a load resistor bank) or connect a fully discharged battery. Turn the CC pot to the desired charge current (e.g., 4A). Do not exceed the power supply’s rated output current.
3. Connect input and output: Solder the power supply’s DC output (+) to the converter’s input (+), and (–) to (–). Then run output wires from the converter to the battery connector. Insert an inline fuse on the positive output wire near the converter.
Image placeholder: Diagram showing power supply → buck converter → inline fuse → battery connector with polarity labels.
Step 3: Add Safety Monitoring
A bare charger has no smart BMS communication. You are responsible for stopping the charge when the pack reaches full voltage. Add these safety layers:
- Install a voltmeter and ammeter inline (or use the display on the CC/CV module if it has one). Monitor them during the entire charge.
- Use a timer or smart plug to cut AC power after the expected charge time (Ah capacity ÷ charge current × 1.2 safety factor).
- Place the charger on a non-flammable surface (concrete, ceramic tile) and never leave it unattended.
- Check cell balance after every three full cycles. If any cell group is more than 0.05V different from others, stop using the homemade charger until the pack is rebalanced.
Common Failure Modes and How to Avoid Them
Even experienced builders run into these issues. Watch for them during testing and early use.
- Overvoltage drift: The CC/CV module may drift upward as it heats. After 30 minutes of operation, recheck the output voltage with a known-good multimeter. Adjust the CV pot if needed. If the voltage continues to drift after adjustment, the module is unstable – replace it.
- Reverse polarity damage: A reversed connection can destroy the converter and start a fire. Use connectors that cannot be plugged in backward (e.g., XT60s are polarized; Anderson PowerPoles are not unless keyed). Some builders install a Schottky diode in series (with a voltage drop sacrifice).
- Undersized wire overheating: 18 AWG wire passing 5A for two hours can get hot enough to melt insulation, especially in an enclosure. Use 14–16 AWG silicone wire and keep runs under 3 feet.
- Power supply failure under load: Cheap LED drivers often shut down or oscillate near their current limit. Test the supply with a dummy load at full charge current before trusting it. If the supply whines or the current reading jumps erratically, the CC/CV module may be oscillating – shorten input wires or add a 100µF capacitor across the module’s input terminals.
- Ground loops and AC leakage: If the power supply is not fully isolated, you can get a small AC voltage on the battery terminals. Measure between battery negative and earth ground with a multimeter set to AC volts — anything above 1V AC indicates a safety issue. Replace the supply.
How to Verify Your Charger Works Safely
Before plugging in your expensive e-bike battery, run these checks:
1. No-load test: With the battery disconnected, measure output voltage. It should be stable within ±0.1V of the target. If the reading is off by more than 0.2V, adjust the CV pot and recheck. If it won’t stabilize, the module may be defective – do not proceed.
2. Resistor load test: Connect a 10-ohm 50W resistor across the output. The current should ramp to the CC set point and voltage should drop. After 30 seconds, disconnect and feel all wires — none should be warm. If any wire is hot, the current is too high or the wire gauge is too thin. Reduce current or use 14 AWG wire before moving on.
3. Partial battery test (if available): Use a known-good battery at 30% capacity. Charge for 10 minutes while watching voltage climb. If voltage rises too fast (more than 1V per minute on a 10Ah pack), the current is too high or the BMS is tripping — stop and reduce current. If the BMS cuts off during this test (open circuit), the charger may be sending a voltage spike – check your settings and try again with a lower current limit.
4. Full charge cycle: Complete one full charge cycle while monitoring. Note the end voltage and how long it takes. Compare to your battery’s datasheet. A healthy charge at 0.4C should finish in about 2.5 hours.
Stop-and-escalate threshold: If at any point during or after these tests the battery becomes hot to the touch (above 110°F), if you smell smoke or see sparks, or if the BMS repeatedly disconnects without an obvious cause, abort immediately. Do not attempt another charge with this setup. Have the battery inspected by a qualified technician before using it again.
Image placeholder: Screen capture of multimeter reading 42.0V during no-load test.
FAQ
How can I charge my electric bike without a charger?
In an emergency, you can connect a DC power supply directly to the battery if you set the voltage and current limits correctly — essentially the same process described above. Never use a power supply that lacks current limiting, and never exceed the battery’s specified charge voltage. Even one overcharge event can permanently damage a lithium-ion pack.
How to create your own charger?
The core method is to pair an isolated DC supply with a CC/CV buck converter, set to your battery’s full charge voltage and a safe current (0.3C to 0.5C of amp-hour capacity). Add an inline fuse and a monitoring voltmeter for safety.
How to make a bike battery charger at home?
Follow the steps in this article: select a power supply, wire a CC/CV converter, set voltage and current, add fusing and monitoring, and test thoroughly. The process is identical for e-bikes, e-scooters, and other small Li-ion packs.
How can I make a homemade battery charger?
For any lithium-ion battery, the essential recipe is a voltage-limited, current-limited DC source. The homemade charger described here works for 36V and 48V packs. Always verify polarity and never leave a homemade charger charging unattended.