How To Remove Battery From Trek E Bike — Step-by-Step Guide
Removing a Trek e‑bike battery takes under a minute once you confirm which mount style your model uses. Most current Trek e‑bikes use a key‑operated lock with a slide or lift release, but the exact motion differs between down‑tube, rear‑rack, and older frame‑mounted designs. Match the procedure below to your battery type, and you’ll avoid the most common sticking points.
Identify Your Trek Battery Mount Type
Trek has used three distinct battery mounting designs over the past decade. Check which one your bike has before attempting removal.
| Mount Type | Typical Trek Models | Key Visual Cues |
|---|---|---|
| Down tube (integrated) | Powerfly, Allant, Rail, Domane+ (2023+), XM700+ | Battery slides into the down tube; lock sits at the top edge or front face of the battery cover |
| Rear rack | Verve+, Urban S+, Town (older), Lift+ (older) | Battery sits on a rear rack under a hinged or snap‑on plastic cover; lock is on the side or underside |
| Frame‑mounted external | Older Domane+ (2019-2022), older District, some 2015-2017 models | Battery attaches to the seat tube or top tube via a bracket; lock is on the battery housing itself |
If you’re still unsure, look for a small key slot near the battery. Trek supplies two keys with each bike, and the lock is typically a round cabinet‑style lock. The key code is often stamped on the lock face — useful if you ever need a replacement.
Removing a Down‑Tube Battery
This is the most common system on current Trek e‑MTBs, commuters, and road bikes.
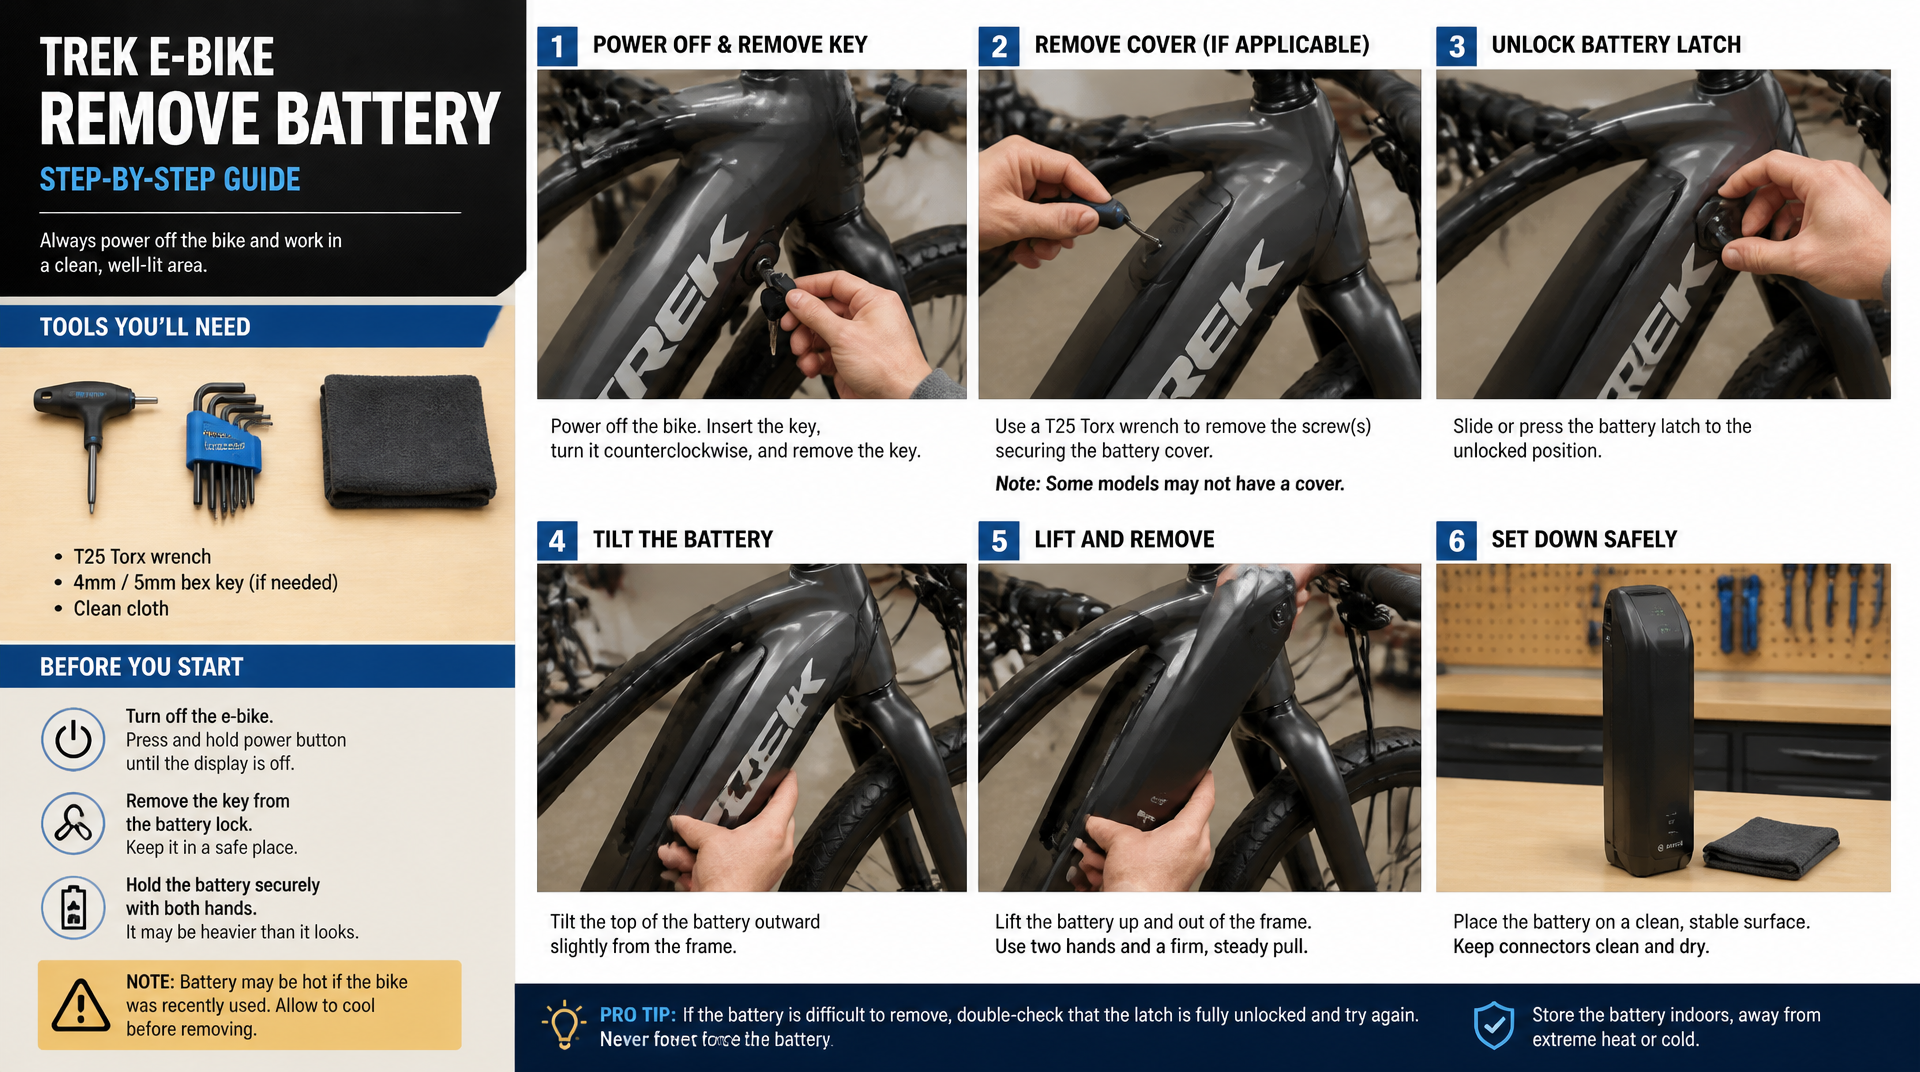
1. Power off the bike. Hold the display power button until the screen goes dark. This prevents the motor from engaging while you handle the battery.
2. Find the key slot. On most down‑tube batteries it’s at the top edge (near the head tube) or on the front face of the battery cover.
3. Insert and turn the key. Turn the key a quarter turn clockwise until you hear a click. Leave the key in the lock while you work — this keeps the lock from re‑engaging unexpectedly.
4. Slide or lift the battery. For slide‑style batteries on Powerfly and Allant models, grip the handle at the battery top and pull upward. The battery slides out of its down‑tube slot. For lift‑style batteries on Rail and Domane+ models, press the secondary release button — a small plastic tab below the lock — while lifting the battery straight up. Some models need a slight forward tilt before the battery clears the frame.
5. Set the battery down carefully. Place it on a clean, dry, non‑metal surface. Metal surfaces can short the terminals.
What normal removal feels like: the battery should move freely once the key is turned. If you feel binding or resistance beyond a light tug, stop and check for a secondary latch rather than forcing it.
Removing a Rear‑Rack Battery
This system appears on Trek’s comfort and hybrid lines. The extra cover step is the main difference.
1. Power off the bike and clear any cargo that blocks the rack area.
2. Open the battery cover. This is usually a hinged plastic lid held by a latch or a separate snap‑on cover. No tools needed.
3. Locate the key slot. It’s typically on the side of the battery housing or underneath an integrated carrying handle.
4. Insert and turn the key to unlock. On some models you need to press the key inward slightly while turning. Listen for the click.
5. Lift the battery out. Use the handle if present, or grip the battery body firmly. It should lift straight up off the rack contacts. If it resists, confirm the key is fully turned and no secondary latch is engaged.
6. Close the rack cover (optional) to keep moisture and debris off the contacts while the battery is off.
A note on rack covers: some older Verve+ models use a cover that snaps into place with two tabs. If the cover feels stuck, press the tabs inward while lifting — do not pry with a screwdriver, which can crack the plastic.
Removing a Frame‑Mounted External Battery
Older Trek e‑bikes from roughly 2015 to 2022 use this design. While less common, many are still in regular use.
1. Power off the bike.
2. Insert the key into the lock on the side of the battery housing. Turn to unlock.
3. Slide the battery sideways or downward depending on the mount orientation. Some batteries ride on a sliding rail; others use a hinged bracket.
4. Disconnect the power cable if your model uses one. Press the release tab on the connector and pull the halves apart — do not yank the wires.
5. Lift the battery away from the frame. If there’s a safety tether, unhook it before setting the battery down.
Watch for cable strain: on models with a tethered connector, the cable can get pinched between the battery and the frame during reinstallation. Inspect the cable for nicks or abrasion each time you remove the battery.
Verifying a Clean Removal
Before you walk away, confirm the removal went smoothly and nothing is damaged.
- Check the battery terminals. Look for dirt, corrosion, or bent pins on both the battery contacts and the bike’s receiving port. A dry cloth is all you need for light cleaning.
- Reinsert the battery briefly (if you plan to use the bike soon). It should slide in fully without excessive force, and the lock should click securely when turned to the locked position. If the battery rocks or feels loose after locking, remove it again and check for obstructions in the mount channel.
- Test power‑on with the battery reinstalled. The display should light up normally, and the motor should engage when you pedal. If the display stays dark or shows an error code, the battery may not be seated properly, or a contact may be damaged.
A clean removal means the battery comes out without scraping the frame, the lock turns smoothly, and the bike powers back on without error codes.
When to Stop and Call a Dealer
Some situations call for professional help rather than continued DIY effort. Stop and contact a Trek dealer or qualified e‑bike technician if you encounter any of the following:
- The battery is visibly swollen, cracked, or leaking. Stop handling it immediately. Place the battery in a fire‑resistant container (a metal bucket with a lid, away from combustibles) and contact your dealer. Do not attempt to charge or ride with a damaged battery.
- The key turns but the battery will not budge even with moderate effort. A stuck battery may indicate a seized latch mechanism, misalignment from a crash, or corrosion inside the mount. Forcing it can damage the frame or the battery casing.
- The lock feels loose or spins freely without engaging. This suggests a broken lock cylinder. A dealer can replace the lock assembly without risking damage to the frame.
- You notice burnt smells, melted plastic, or discolored contacts. These are signs of electrical arcing or a short circuit. Have the system inspected before riding or charging again.
- The secondary release button is broken or missing. On down‑tube models with a lift‑style release, operating without that button can jam the battery permanently.
The general rule: if you are applying enough force that it feels risky, stop. Trek batteries and mounts are designed to release with firm but moderate hand pressure. Anything beyond that warrants a professional look.
Troubleshooting a Stuck Battery
| Problem | Likely Cause | What to Try |
|---|---|---|
| Key won’t turn | Lock slot clogged with dirt, grit, or ice | Blow compressed air into the lock opening. If you suspect ice, warm the area with a hair dryer on low heat — never use a torch or heat gun. If the key still won’t turn after cleaning, the lock cylinder may be damaged; do not force it. |
| Battery won’t slide or lift out | Secondary latch still engaged, or battery is slightly misaligned | Press any visible release button while gently rocking the battery side‑to‑side (less than ¼ inch of movement). On down‑tube models, try pushing the battery down a fraction of an inch to re‑align the release mechanism before pulling up. |
| Battery lifts partway then sticks | Debris in the mount channel, or the battery is binding against the frame | Shine a flashlight into the mount opening. |
Leaves, mud, or a small stone can block the path. Remove debris with a blunt tool — do not use sharp metal objects that could scratch the frame or battery casing. |
| Battery reinserts but feels loose | Not fully seated, or lock is not engaging the latch | Remove the battery and reinsert it, applying firm, even pressure from the top. Listen for a positive click when you turn the key to lock. If the battery still rocks, the mount latch or battery slot may be worn; have a dealer evaluate the fit. |
| Battery powers off during a ride | Loose connection from incomplete seating or worn contacts | Remove the battery, clean the contacts with a dry cloth, and reinstall, making sure you hear the lock click. If the problem persists, the internal contacts may need professional adjustment. |
Frequently Asked Questions
Can I remove the battery without the key?
No. Trek batteries use a lock that prevents removal without the correct key. If you lose your key, check the lock face for a stamped code — a Trek dealer or locksmith can cut a replacement from that code.
Is it safe to ride without the battery installed?
Yes, but the bike will function as a standard bicycle with no pedal assist. The motor adds some drag, so pedaling will feel heavier than on a non‑e‑bike. Removing the battery reduces weight if you plan to ride without assist for an extended period.
Should I remove the battery for storage or car‑rack transport?
Trek recommends removing the battery for long‑term storage (more than two weeks) and when transporting the bike on a car rack. This prevents unnecessary discharge and protects the battery from vibration and temperature extremes.
How often should I remove the battery for maintenance?
Remove it every few rides, especially after riding in wet or muddy conditions, to wipe down the contacts and check for debris. Monthly cleaning is sufficient for dry‑weather riding. More frequent removal also helps you spot corrosion or wear before it becomes a problem.
Removing a Trek e‑bike battery is a straightforward task when you match the procedure to your mount type. Identifying the correct release motion, verifying a clean removal, and knowing the few conditions that warrant a dealer visit will keep your battery and electrical system in good working order for years.