Connecting a battery to your Giant e bike is an essential skill for any e bike owner, ensuring optimal performance and reliability. This article will guide you through the necessary steps and considerations to effectively connect the battery to your Giant e bike, promoting a seamless riding experience. We will begin by discussing how to choose the right battery, followed by the tools required for this task. Additionally, we will highlight important safety precautions to observe before commencing the connection process. By following our comprehensive step-by-step guide, you will be equipped to troubleshoot common issues and maintain your battery for longevity.
Key Takeaways
Regularly inspect battery terminals, wiring, and connectors to maintain optimal electrical performance and prevent issues.
Use the appropriate tools and safety equipment, such as insulated gloves and safety goggles, to ensure a safe battery connection process.
Familiarize yourself with battery indicators and alerts to monitor performance and address issues promptly.
Follow a step-by-step guide for battery connection, including ensuring compatibility and conducting tests post-connection for proper functionality.
Choosing the Right Battery for Your Giant E Bike
Selecting the appropriate battery for your Giant E Bike is crucial for optimizing performance and ensuring longevity. Understanding the various battery types and their compatibility with your bike model is essential in making an informed decision. Additionally, considering voltage and capacity will help you achieve the desired range and efficiency for your riding experience.
Battery Types and Compatibility
Battery types and their compatibility with specific Giant E Bike models play a significant role in determining overall performance and efficiency. Different models may require specific types of lithium-ion batteries, emphasizing the need for proper matching. Voltage ratings must align with the bike’s electrical system to ensure optimal functionality. Additionally, the capacity of the battery directly influences the range and duration of rides. Selecting the right battery not only enhances performance but also contributes to the longevity of the bike’s components.
Voltage and Capacity Considerations
Voltage and capacity are critical factors that directly influence the performance and range of an electric bike, requiring careful assessment to align with the rider’s needs and usage patterns. Higher voltage typically results in greater power output, enabling faster acceleration and improved hill-climbing ability. Conversely, capacity, measured in amp-hours, determines how long the battery can sustain a given level of power before needing a recharge. Riders must consider the trade-off between weight and performance, as larger capacity batteries often add extra weight to the bike. Ultimately, selecting the right voltage and capacity combination is essential for achieving an optimal riding experience tailored to individual requirements.
Tools Required for Battery Connection
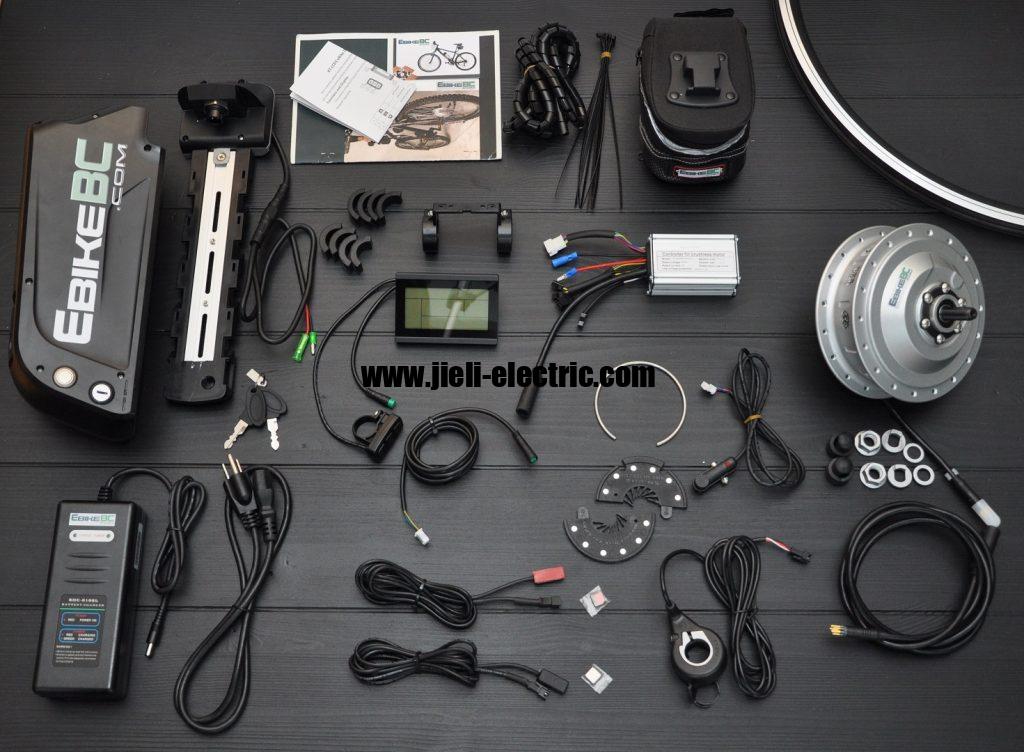
When connecting a battery to your Giant E Bike, having the appropriate tools is crucial for ensuring a secure and efficient installation. This process not only requires essential tools but also emphasizes the importance of safety equipment to protect the user during the connection. The following points outline the necessary tools and recommended safety measures to facilitate a successful battery connection.
Essential Tools Needed
The essential tools needed for the installation of a battery on a Giant E Bike include a wrench set, screwdriver, and safety gloves to ensure both efficiency and safety during the process. A multimeter can also be helpful for verifying electrical connections and battery voltage. Additionally, a torque wrench is recommended to ensure that all components are secured to the manufacturer’s specifications. A clean cloth is useful for wiping off any dust or debris that may affect the connection. Proper organization of these tools can streamline the installation process and minimize the risk of errors.
Recommended Safety Equipment
Recommended safety equipment includes insulated gloves, safety goggles, and a fire extinguisher, all of which are essential for minimizing risks during battery connection. Insulated gloves protect against electrical shock, ensuring the user’s safety while handling battery terminals. Safety goggles shield the eyes from potential splashes of battery acid or debris that may arise during the process. A fire extinguisher serves as a critical precautionary measure to address any unforeseen fires that may occur due to battery malfunction or short circuits. Proper use of this safety equipment significantly enhances the overall safety of the battery connection process.
Safety Precautions Before Starting
Before initiating the process of connecting a battery to your Giant E Bike, it is essential to prioritize safety precautions. Ensuring that you are properly equipped and that your tools and equipment are in optimal condition can significantly mitigate risks. With this in mind, consider the following important safety measures: wear protective gear and inspect equipment thoroughly.
Wear Protective Gear
Proper protective gear is crucial for ensuring personal safety while working with electrical components in a Giant E Bike. This includes the use of insulated gloves to prevent electric shocks and safety goggles to shield the eyes from potential hazards. Additionally, wearing long sleeves and sturdy footwear can provide further protection against accidental contact with sharp edges or exposed wires. It is also advisable to utilize a dust mask if working in an environment with debris or chemicals that could pose a respiratory risk. Adhering to these safety measures can significantly reduce the likelihood of injury during the battery connection process.
Inspect Equipment Thoroughly
Thorough inspection of equipment is crucial to ensure that all components are functioning correctly and safely prior to connecting the battery. This includes checking for any signs of wear or damage on cables, connectors, and the battery itself. Additionally, ensure that all tools utilized during the process are in good condition and free from defects. A thorough examination can prevent potential hazards, such as short circuits or electrical failures. Taking these preventive measures can significantly enhance the overall safety and reliability of the battery connection process.
Step-by-Step Guide to Connecting the Battery
Connecting the battery to your Giant E Bike requires careful attention to detail to ensure optimal performance and safety. This step-by-step guide will outline essential processes for preparing the battery connection and securing the battery properly. Following these guidelines will facilitate a seamless integration of the battery into your bike’s system.
Preparing the Battery Connection
Preparation of the battery connection is crucial for ensuring both the efficiency and safety of your Giant E Bike’s electrical system. Begin by inspecting the battery terminals for any signs of corrosion or damage, as this can impede performance. Next, ensure that the battery is fully charged to avoid unnecessary interruptions during use. It is also important to verify that all wiring components are in good condition and compatible with the battery specifications. Lastly, take a moment to familiarize yourself with the manufacturer’s guidelines to ensure proper handling and connection procedures.
Securing the Battery Properly
Securing the battery properly is crucial for maintaining the stability and safety of your Giant E Bike during operation. Ensure that the battery is aligned correctly within its designated compartment before fastening. Utilize the provided locking mechanisms or straps to hold the battery firmly in place. Regularly inspect the battery connection points for any signs of wear or damage. A secure battery connection not only enhances performance but also mitigates potential hazards while riding.
Testing the Connection for Proper Functionality
Once the battery is connected, it is crucial to verify that the connection is functioning properly. This involves conducting a series of tests to ensure both visual integrity and electrical performance. The following points outline the essential steps for testing the connection effectively.
Visual Inspection Steps
A comprehensive visual inspection is essential to identify any potential issues that may affect the overall functionality of the connection. Inspect the battery terminals for any signs of corrosion or damage, ensuring they are clean and free from debris. Examine the wiring for frays, breaks, or wear that could compromise electrical performance. Check the connectors to confirm they are securely attached and show no signs of looseness. Finally, evaluate the overall condition of the battery housing to ensure it is intact and free from cracks or other structural deficiencies.
Voltage Measurement Techniques
Voltage measurement techniques play a vital role in diagnosing electrical systems and ensuring optimal performance. Accurate voltage readings provide critical insights into the functionality of the battery and its connections. Employing multimeters or voltmeters allows technicians to assess voltage levels effectively, ensuring they fall within specified ranges. Furthermore, understanding the differences between AC and DC voltage measurements is essential for accurate diagnostics. Regular voltage checks can prevent potential failures and enhance the longevity of electrical components.
Troubleshooting Common Issues
Troubleshooting common issues often requires a systematic approach to identify and resolve underlying problems effectively. Begin by checking all connections to ensure they are secure and free from corrosion. Next, measure the voltage output to confirm that it aligns with the manufacturer’s specifications. If discrepancies are found, inspect the battery and wiring for potential damage or wear. Finally, consult the user manual for specific error codes or indicators that may assist in diagnosing any persistent issues.
Troubleshooting Common Connection Issues
Troubleshooting common connection issues is essential for ensuring the optimal performance of your Giant E Bike. By systematically addressing potential problem areas, you can identify and rectify any disruptions that may impair functionality. The following points will guide you through the critical steps needed to resolve these connection issues effectively.
Inspecting Battery Connections
Inspecting battery connections is crucial for maintaining the reliability and efficiency of your Giant E Bike’s power system. Loose or corroded connections can lead to intermittent power loss and reduced performance. Regular checks should include examining terminals for signs of wear or oxidation. Ensuring that all connections are secure and free from debris is essential for optimal functionality. Addressing any issues promptly will enhance your biking experience and prolong battery life.
Checking Wiring Integrity
Ensuring wiring integrity is crucial for maintaining the reliable operation of your Giant E Bike’s electrical system. Inspect all wiring for signs of wear, fraying, or damage that could lead to shorts or connection failures. Pay particular attention to the connectors and terminals, ensuring they are clean and securely fastened. Conduct periodic checks to verify that the insulation is intact and that no moisture has penetrated the wiring. Address any issues promptly to prevent further complications and ensure optimal performance.
Testing Voltage Output
Accurate testing of voltage output is critical for assessing the functionality of the electrical components in your Giant E Bike. Begin by using a multimeter to measure the voltage at the battery terminals, ensuring the readings align with the manufacturer’s specifications. Next, check the voltage at various connection points throughout the wiring harness to identify any discrepancies. It is crucial to compare the measured values against expected outputs to determine the health of the system. Regular testing can preemptively highlight potential issues, facilitating timely maintenance and repairs.
Ensuring Secure Mounting
Secure mounting is crucial for the stability and safety of your Giant E Bike during operation. Properly securing the battery ensures optimal electrical connection and prevents any accidental disconnections while riding. Regular inspections of the mounting hardware will help identify any wear or loosening that may compromise safety. Additionally, using the manufacturer-recommended mounting brackets can enhance reliability and performance. Always adhere to best practices for battery installation to maintain the integrity of your bike’s electrical system.
Maintaining Your Battery for Longevity
Maintaining your battery for longevity is essential to ensure optimal performance and extended usage of your Giant E Bike. By adhering to proper charging techniques and implementing effective storage best practices, you can significantly enhance the lifespan of your battery. These key strategies will be outlined in the following points.
Proper Charging Techniques
Proper charging techniques play a critical role in maximizing the efficiency and lifespan of your Giant E Bike’s battery. It is advisable to charge the battery when it reaches around 20-30% capacity to avoid deep discharging. Utilizing the manufacturer’s recommended charger ensures compatibility and prevents potential damage. Additionally, avoid exposing the battery to extreme temperatures during the charging process, as this can adversely affect its performance. Regularly checking the battery’s health and following a charging schedule can further enhance its longevity.
Storage Best Practices
Optimal storage conditions play a crucial role in prolonging the life of your Giant E Bike battery. It is essential to store the battery in a cool, dry place to prevent damage from extreme temperatures and humidity. Regularly check the battery’s charge level and maintain it at around 50% for optimal longevity. Additionally, avoid leaving the battery in direct sunlight or near heat sources during storage. Using a protective case can further safeguard the battery from physical impacts and environmental factors.
Understanding Battery Indicators and Alerts
Understanding battery indicators and alerts is crucial for ensuring efficient operation and maintenance of your electric bike. These indicators provide important information regarding the battery’s status, enabling users to make informed decisions about charging and usage. By familiarizing yourself with the various types of battery indicators and alerts, you can enhance your riding experience and prolong the life of your battery.
Battery Indicator Types
Battery indicator types vary widely among electric bike models, each designed to convey specific information about charge levels and operational status to the user. Common indicators include LED light systems, which typically use a series of lights to represent the remaining battery capacity. LCD displays offer more detailed information, such as voltage levels, remaining range, and time until depletion. Some advanced models incorporate smartphone connectivity, allowing real-time monitoring and notifications through dedicated applications. Understanding these indicators is essential for optimizing battery performance and ensuring a safe riding experience.
Common Alerts Explained
Common alerts serve as essential notifications that inform users about critical issues related to the electric bike’s performance and battery health. These alerts can indicate low battery levels, overheating, or system malfunctions, prompting immediate attention from the rider. Additionally, alerts may signal the need for maintenance or servicing to ensure optimal functionality. Ignoring these notifications can lead to decreased performance or potential damage to the bike. Regularly monitoring these alerts is vital for maintaining the longevity and efficiency of the electric bike.
Interpreting Indicator Signals
Interpreting indicator signals is essential for identifying the battery’s health and performance, allowing users to respond appropriately to any potential issues. Different colors and patterns of lights often indicate varying levels of charge or potential faults. Users should pay attention to flashing indicators, as they may signify urgent maintenance needs. Regularly monitoring these signals can prevent unexpected breakdowns and enhance safety during rides. Ultimately, a clear understanding of indicator signals contributes to the overall longevity and reliability of the e-bike battery.
Tips for Disconnecting the Battery Safely
When disconnecting the battery from your e-bike, prioritizing safety is essential to prevent accidents and damage. Adhering to best practices will ensure a smooth and secure process. The following tips will guide you in safely disconnecting the battery.
Wear Protective Gear
Wearing protective gear is crucial for ensuring personal safety during the process of disconnecting the battery from an e-bike. This gear should include safety goggles to protect the eyes from any potential sparks or debris. Additionally, gloves made from insulating materials are necessary to minimize the risk of electric shock. It is also advisable to wear long sleeves and durable clothing to shield the skin from potential battery acid exposure. Lastly, closed-toe shoes provide added protection against accidental drops or spills.
Follow Manufacturer Guidelines
Following manufacturer guidelines is crucial for ensuring proper disconnection procedures and maintaining the longevity of your e-bike’s components. Each e-bike model may have specific instructions tailored to its design, necessitating careful attention to detail. Ignoring these guidelines can lead to potential damage or malfunction of the electrical system. Additionally, adhering to these standards can enhance safety during the disconnection process. Always consult the user manual before proceeding to ensure compliance with recommended practices.
Secure Cables Properly
Proper cable management is crucial for ensuring the longevity and optimal performance of your e-bike’s electrical system. Securing cables properly minimizes the risk of wear and tear, which can lead to electrical failures. It is important to use cable ties or clips to keep the cables organized and away from moving parts. Additionally, ensure that the cables are routed in a manner that prevents pinching or excessive bending. Regularly inspect the cable connections for any signs of damage or loosening to maintain a safe and efficient e-bike operation.
Frequently Asked Questions
How long does it typically take to charge the battery of a giant e bike?
The charging duration for a Giant e-bike battery generally ranges from four to six hours, depending on the specific model and the capacity of the battery. Factors such as the remaining charge level and the type of charger used can also influence the overall charging time. It is advisable to consult the manufacturer’s guidelines for precise information tailored to your specific e-bike model. Consistently adhering to recommended charging practices can help maintain battery health and longevity.
Can i use a different brand of battery with my giant e bike?
Using a different brand of battery with your Giant e-bike is generally not recommended. E-bikes are designed to operate with specific battery types that match their electrical systems, and using an incompatible battery could lead to performance issues or damage. Additionally, such modifications may void any warranties or support associated with the bike. It is advisable to consult the manufacturer or a qualified technician to ensure compatibility and maintain optimal performance.
What are the signs that my battery needs to be replaced?
There are several key indicators that suggest a battery may need to be replaced. A noticeable decrease in the overall range or performance during rides often signifies that the battery’s capacity has diminished. Additionally, if the battery takes an unusually long time to charge or fails to hold a charge, it may be indicative of underlying issues. Lastly, physical signs such as swelling, leakage, or significant wear can further confirm the necessity for replacement to ensure safe and reliable operation.
If you’re interested in the latest innovations in e-bike technology, I highly recommend checking out the article on "The Future of Commuting: E-Bikes That Charge While You Pedal." This insightful piece explores how these cutting-edge bikes can enhance your riding experience and provide sustainable energy solutions. You can read more about it here.