How to Install a Mid-Drive Motor on an E-Bike: Step-by-Step Guide (2026)
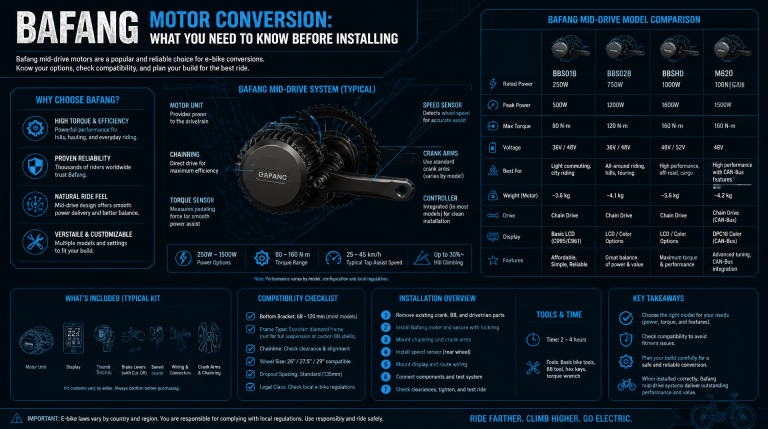
A mid-drive conversion puts the motor at your bottom bracket, driving through your bike’s gears instead of pushing the wheel directly. That means better hill-climbing and a more natural pedal feel. The full install takes 4–8 hours for a first-timer. This guide covers Bafang BBS-series and TSDZ2-style motors, which account for roughly 80% of DIY mid-drive installs. Torque values and alignment checks are the difference between a ride that lasts years and one that fails in weeks.
Tools and Parts Checklist
Tools required:
- Bottom bracket removal tool (specific to your bike’s BB type — BSA/English threaded is the standard)
- Crank puller
- 8mm, 10mm, 13mm, 15mm sockets and wrenches
- Torque wrench (0–50 Nm range minimum)
- Allen key set (metric, 2.5mm–8mm)
- Cable cutters, heat shrink, electrical tape
- Zip ties (assorted sizes)
- Grease (anti-seize for steel threads, lithium for aluminum)
Parts to have on hand:
- Mid-drive motor kit (motor, controller, display, wiring harness, throttle if included)
- Battery and mounting hardware (verify connector compatibility with your motor)
- Optional: new chain (mid-drive wears chains faster than hub motors)
Verify Bottom Bracket Compatibility First
This is the most common failure point. Mid-drive motors mount into the bottom bracket shell, and not all bikes fit.
Measure your BB shell width:
- Standard BSA threaded: 68mm or 73mm
- Remove the cranks and bottom bracket, then measure the shell width with a caliper
- Most Bafang BBS02/BBSHD kits ship with a locknut that works for both sizes, but you need the correct spacer configuration
Check threading:
- BSA/English (1.37″ x 24 TPI) — works with Bafang, TSDZ2, CYC, and most aftermarket kits
- Italian (36mm x 24 TPI) — rare on modern bikes; requires a specific adapter
- Press-fit (BB30, PF30, BB86, etc.) — not compatible without a press-fit to BSA adapter, which adds failure points
Decision rule: If your bike has a press-fit bottom bracket, a mid-drive conversion is not recommended unless you’re willing to replace the frame or use a proprietary motor like the Bosch Gen4 (which requires a compatible frame). Stick to hub motor kits for press-fit frames.
Remove the Existing Bottom Bracket and Cranks
1. Remove the pedals and cranks using a crank puller
2. Remove the bottom bracket cups using the correct tool for your BB type
3. Clean the threads inside the BB shell with a rag and degreaser
4. Inspect the shell for cracks, stripped threads, or ovalization — if present, stop and replace the frame
Torque note: Factory BB cups are often torqued to 35–50 Nm. Use a breaker bar if needed, but avoid impact tools that can damage aluminum frames.
Branch point: After cleaning, run a finger along the inside of the shell threads. If you feel any sharp edges, burrs, or galling, stop here. A damaged thread will not hold the motor’s locknut securely, and the motor will shift under load. You have two options: chase the threads with a BSA tap (if you have the tool and experience), or take the frame to a shop. Do not proceed with installation on damaged threads — the motor will loosen within the first few rides and can ovalize the shell beyond repair.
Install the Motor and Locknut
1. Slide the motor through the BB shell from the drive side (right side of bike)
2. The motor’s mounting flange should sit flush against the BB shell
3. Thread the locknut onto the motor from the non-drive side
4. Hand-tighten first, then torque to 40–50 Nm (check your kit’s spec sheet — Bafang specifies 40–50 Nm for the locknut)
Common mistake: Overtightening the locknut can crack the BB shell on aluminum frames. Use a torque wrench. If you don’t have one, tighten until snug plus a quarter turn — no more.
Spacer check: If your BB shell is 68mm, you’ll need the spacer that comes with the kit on the non-drive side. For 73mm shells, no spacer is needed. Verify this before final tightening.
Alignment verification: Before final torque, spin the cranks by hand. The chainring should rotate in a true plane — no wobble. If you see lateral movement, the motor isn’t seated square in the shell. Loosen the locknut, reseat the motor, and retighten. A misaligned chainring will cause chronic chain drops and accelerated drivetrain wear.
Mount the Controller and Route Wiring
Most kits have a separate controller box (Bafang BBSHD) or an integrated controller (TSDZ2).
Controller placement:
- Mount on the downtube or under the bottom bracket
- Use the included bracket or zip ties
- Keep the controller away from the chain line and suspension linkage
- Leave 2–3 inches of slack in all cables to prevent pulling
Wiring order:
1. Connect the motor phase wires (three thick wires — match colors)
2. Connect the hall sensor connector (thin wire harness)
3. Route the display cable up the downtube, zip-tie every 6–8 inches
4. Route the throttle cable (if using) along the top tube or handlebar
5. Connect the brake sensor wires (if your kit includes them)
Torque sensor note: TSDZ2 motors have a built-in torque sensor. The sensor is calibrated at the factory, but you may need to adjust the preload if the motor engages too early or too late. This is done via the display settings — not by mechanical adjustment.
Failure mode to prevent: The most common electrical failure in DIY mid-drive installs is a pinched phase wire where the harness exits the motor. Route the bundle so it curves downward and away from the chainring before turning upward toward the controller. A zip tie placed too close to the motor exit point will pinch the wires against the frame under load.
Install the Battery and Connect Power
1. Mount the battery cradle to the frame using the supplied bolts (torque to 5–8 Nm for M5 bolts)
2. Ensure the cradle is level and the battery slides in without binding
3. Connect the battery’s discharge connector to the motor’s power input
4. Connect the charge port (if separate)
Voltage check: Verify your battery voltage matches the motor rating. A 48V motor running on a 52V battery is usually fine (within 10% overvoltage). A 36V motor on a 52V battery will burn out the controller.
Connector inspection: Before plugging in the battery, inspect both connectors for bent pins or debris. A bent pin that makes intermittent contact will cause voltage spikes that can destroy the controller. If you see any discoloration or melting on the connector body, replace the connector before powering up.
Configure the Display and Run First-Ride Tests
1. Turn on the display — it should power up and show battery voltage
2. Set wheel size in the display settings (critical for speed accuracy)
3. Set the number of magnet poles in the speed sensor (usually 1 or 2)
4. Set the maximum speed limit (default is often 25 km/h for EU compliance; US users can set to 32 km/h or higher depending on local laws — verify locally)
First-ride test sequence:
1. Lift the rear wheel and pedal — the motor should engage smoothly
2. Test the throttle (if equipped) — should provide gradual power, not jerky
3. Ride in a straight line at low speed (10–15 km/h) — listen for clicking, grinding, or rattling
4. Shift through all gears — the motor should handle gear changes without hesitation
5. Test brakes — brake sensors should cut motor power immediately
Failure signal: If the motor makes a grinding noise under load, stop immediately. This usually means the motor isn’t seated correctly in the BB shell, or the locknut is loose.
Escalation threshold: If the motor emits a burning smell, cuts out under load within the first 10 minutes of riding, or throws an error code that persists after power cycling, stop riding. These symptoms point to a controller or motor winding issue that requires replacement under warranty — not a field repair. Contact the kit manufacturer with your order number and a video of the symptom. Continuing to ride will void the warranty and can damage the battery.
Common Failure Cases and Fixes
| Symptom | Likely Cause | Fix |
|---|---|---|
| Motor won’t spin | Loose phase wire connection | Check and reseat all three phase wires |
| Jerky acceleration | Torque sensor misalignment (TSDZ2) | Recalibrate via display settings |
| Chain drops off | Chain line is too far off-center | Add/remove spacers on the motor mounting flange |
| Battery won’t charge | Connector pin bent or broken | Inspect and replace connector |
| Display flickers | Loose connection at display port | Apply dielectric grease and reseat |
Chain line diagnosis: If the chain drops on the smallest rear cog only, the chain line is off by 1–2mm. If it drops on the largest cog, the chain is too short or the derailleur limit screw needs adjustment. These are different fixes — don’t start adding spacers until you’ve confirmed which gear triggers the drop.
FAQ
How to add a mid drive motor to a bike?
Remove the existing bottom bracket and cranks, install the motor through the BB shell, tighten the locknut to 40–50 Nm, mount the controller, route wiring, install the battery, and configure the display. The full process takes 4–8 hours.
Are mid motor ebikes better than hub motors?
Mid-drive motors are better for hill climbing, off-road riding, and maintaining a natural pedal feel because they use the bike’s gears. Hub motors are simpler, cheaper, and require less maintenance. Choose mid-drive if you ride steep terrain; choose hub if you ride flat city streets and want a lower-cost conversion.
Is there a mid-drive ebike conversion kit that comes with a battery?
Yes. The BAFANG Mid Drive Kit 750W 1000W 500W BBS02B BBS-HD Electric Bike Conversion Kit 48V 52V includes a battery option at checkout. Most kits are sold motor-only; verify the listing includes a battery before purchasing.
What is the best mid drive e-bike motor?
For DIY conversions, the Bafang BBS02B (750W) is the most reliable and best-supported option, with a 4.1/5 rating and wide parts availability. The TSDZ2 offers better torque sensing for a more natural pedal feel but has a lower power ceiling (500W nominal). For factory-built bikes, Bosch Performance Line and Shimano Steps are the industry standards, but they require compatible frames and cannot be retrofitted to a standard bike.
Video Section
Search YouTube for “Bafang BBS02 install guide” by Johnny Nerdout or “TSDZ2 installation tutorial” by EcoCycles — both walk through the exact torque values and alignment checks covered here. Watch the full video before starting your install to see the process in real time.
Success Check
After your first 20 km ride, re-check the locknut torque (40–50 Nm) and inspect all wiring connections for signs of rubbing or heat damage. If the motor runs smoothly through all gears and the battery holds charge without error codes, your install is complete.